Showing posts with label Terrain. Show all posts

Tuesday, 29 June 2010

FoW - How to make Fields

A while back I came across the idea for making wheat fields out of door mats on the FoW forums.  I tried to track something suitable at all of the hardware stores, but the closest thing I could find was over $15 AU and I'd have to peel off the glued on felt like substance that said "Welcome" on it in bright green.  It wasn't until about a month ago that I popped into a thread created by "Big Gav".  Big Gav happens to be my current source of inspiration for FoW terrain building, the stuff that man makes is amazing.  In this instance however, he was pointing out that the mats that he buys to make wheat fields can be bought from Target and they were having 30% off.  I popped into Target a week later and picked up two coir mats for $14 AU, brilliant!  Here's how it works:

Step 1.
Get the mat, turn it over and mark out how you want to cut it up.  In half and quarters is ideal.  Do all of this outside as it excess matting comes off the mat and makes things messy.

Step 2.
Carefully cut the rubber of the mat along the line you just marked out.  Take two or three goes slicing slightly deeper each time, making sure your lines are straight.

Step 3.
Take your sections of wheat field and lay them with the rubber side up.  Use PVA glue to run a fine line along one edge of the rubber.  Push static grass against it to cover the black rubber.  Do this with the opposite side and then let it dry for an hour or so.  Once it's dry do the remaining two sides.

Your wheat field is now complete.  Happy gaming.

Eltnot.

Thursday, 29 May 2008

I'm pulling my finger out, and getting all the stuff ready for COWCON 2008. I've already accepted that I won't get my Witch Hunters to a finished standard, but I still have some goals. I'm aiming to have my three basic colours on each model, including some highlighting on the blue to actually make it visible on the models. I also would like to get all of the models based (to my finished basing standard) if I can. Below is a list of where I'm at, and what I have still to do.


Canoness
- Undercoated and needing Jump Pack

Palantine
- Undercoated
Celestians
- First coat of Grey
Immolator
- Undercoated (except for Turret)

Death Cult Assassins
- Undercoated

Inquisitor and Retinue
- Undercoated

Battle Sister Squad 1
- Meeting three colours except for blue highlights and backpacks
Rhino
- Undercoated and almost finished with three colours (needing tracks)

Battle Sister Squad 2
- First coat of Grey
Rhino
- Undercoated

Infantry Platoon
- Being assembled

Seraphim
- First coat of Grey

Immolator
- Undercoated (except for Turret)

Exorcist
- Mostly assembled

Exorcist
- Partially assembled

Jungle Terrain
- Finish painting trees (1/3 done)
- Finish bases (mostly final drybrushing and paint pollups)

Desert Terrain
- Put together two buildings and glue the rest together, paint and add detail
- Paint and Sand Rock Spires
- Paint and base Pig Pen

-Eltnot

Saturday, 29 March 2008

Hedges

I’m pulling my finger out and getting some terrain finished off for the combat patrol tournament. After looking at my collections, I realised that I needed a little more for each of the tables to bring them up to the 25% recommended coverage. For my temperate terrain board, I snagged on the idea of making some hedges. For starters, they look pretty nice on a table, giving it that finished touch. They also open up different tactical opportunities as they are rather different to other terrain. So without further ado, a guide to make some really cheap terrain.

What do you need:

Some green rectangular scouring pads (I picked up a pack of ten for $1.30AU), some square balsa wood rod, lots of PVA glue, scissors and some clothes pegs.

First take your scouring pads and fold them in half to gauge the height. I cut a strip off the long edge about 1cm wide to get the right height. Keep the strip, you’ll use it shortly. Fold your remaining scouring pad in half and place the off cut strip in between the two halves, so that it fills the gap at the end. Cut it off at the appropriate length. Do the same for the other side. Glue these ends onto the edges of the scouring pad on one side, and whatever is left of your strip along the bottom. Now take some short lengths of balsa, and glue them up against your ends. The PVA has problems gluing the scouring pad together, but the balsa give more surface area for the glue to hold onto like so:

Let this dry fully before adding more glue, and folding the pad over to make the hedge. Use clothes pegs to hold it together whilst it dries:

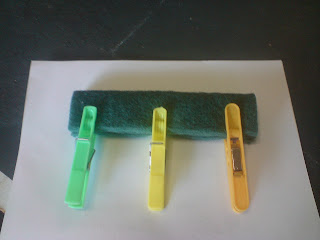
If you want to, you can rough up the hedges a little, but I found it wasn’t really worth it. It just made it look like I’d used the pad for cleaning before turning it into a hedge.

A whole bunch of hedges waiting to dry.

The hedges are high enough for an infantry model to hide behind, but not a tank

A unit of Damo's Terminators take cover behind a hedge row

Comments welcome